In this lesson, you'll learn to use list views. Run this basic app. Add a ListView with android:layout_width="match_parent", android:layout_height="match_parent" Assign a new ID to the ListView by setting attribute android:id to value @+id/mainListView1. We have added an array with company names that we want to show in the ListView. To fill the ListView use a ListAdapter. Pass this as the context to the constructor, android.R.layout.simple list_item_1 as the entry layout and companies as the data. Now get the ListView object with findViewById and assign it to a variable. Finally, call setAdapter() on the ListView object and pass the adapter. First we set a new OnItemClickListener with setOnItemClickListener() on the ListView. Now inside the onItemClick method get the list entry text with l.getItemAtPosition(position) and assign it to a new variable String s. Finally, show a toast with the text s.
Add Toast.makeText(MainActivity.this, s, Toast.LENGTH SHORT).show() inside the onItemClick method. Congratulations! You've learned to add a list view to your app. Play with the code on your own a bit. In the next lesson, you'll learn to customize the list entries.
REQUIREMENTS:
Download:
Eclipse
Instruction:
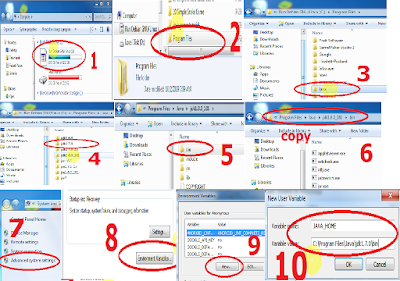
After you download all the files needed in this tutorial, we need to install and set-up a java JDK path to our environment variables, the step below will show you how.
--Go to Java JDK installation directory in "C:\Program Files\Java\jdk1.7.0\bin" Copy this path
--Go to the environment path by Clicking: Window taskbar--->right click Computer--->Click Advance System setting ---> then go to Advanced tab Then select "Environment Variable" then create new Variable name and variable value by clicking the New radio button. Within the "Variable name" input these "JAVA_HOME" then in the "Variable value" point it to your C:\Program Files\Java\jdk1.7.0\bin
that's it we are on a way of creating our first game and deploy it to a different platform.
After that we will also set-up Android SDK, to its path by extracting first it to the directory you want for example in "drive D:" or "drive C:" once we did this, we can now copy the root folder of this SDK which is likely to this format "D:\Android SDK" copy it then add it also to the "Environment path" like what you did before in "Java JDK".
MAIN ACTIVITY CODE
MAIN XML CODE
MAIN ACTIVITY CODE
MAIN XML CODE


0 Comments