Android App Manifest Tutorial


In this lesson, you'll learn about the App Manifest file, which presents essential information about your app to the Android system. Run this basic app. This is the App Manifest file. 

ANDROID MANIFEST XML CODE

<?xml version="1.0" encoding="utf-8"?>
<manifest xmlns:android="http://schemas.android.com/apk/res/android"
    package="com.aide.trainer.myapp"
    android:versionCode="1"
    android:versionName="1.0" >

    <uses-sdk 
        android:minSdkVersion="11" 
        android:targetSdkVersion="17" />

    <application
        android:icon="@drawable/ic_launcher"
        android:label="@string/app_name" >
        <activity
            android:label="My cool App"
            android:theme="@android:style/Theme.Holo"
            android:name=".MainActivity" >
            <intent-filter >
                <action android:name="android.intent.action.MAIN" />   <category android:name="android.intent.category.LAUNCHER"/>
            </intent-filter>
        </activity>
    </application>
</manifest>

It tells the Android system essential information about your app, like the package name and version. The App Manifest file contains an application element that defines the name and icon of your app and declares all its activities This app only has one activity element which tells the system that MainActivity is the launch activity of the app. Set android:label="My cool App" of the activity element. Change the android:theme attribute of the activity element to @android:style/Theme.Holo. Congratulations! You've learned about the App Manifest. Play with it on your own a bit. Change the application label as well. Then learn to start activities with intents in the next lesson.

REQUIREMENTS:
Download:
Eclipse
Download pdf
Instruction:
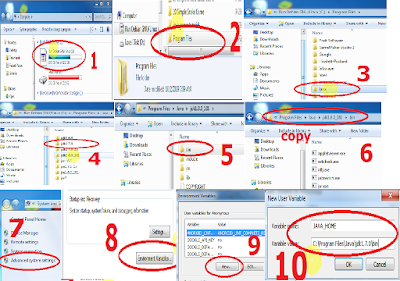
After you download all the files needed in this tutorial, we need to install and set-up a java JDK path to our environment variables, the step below will show you how.

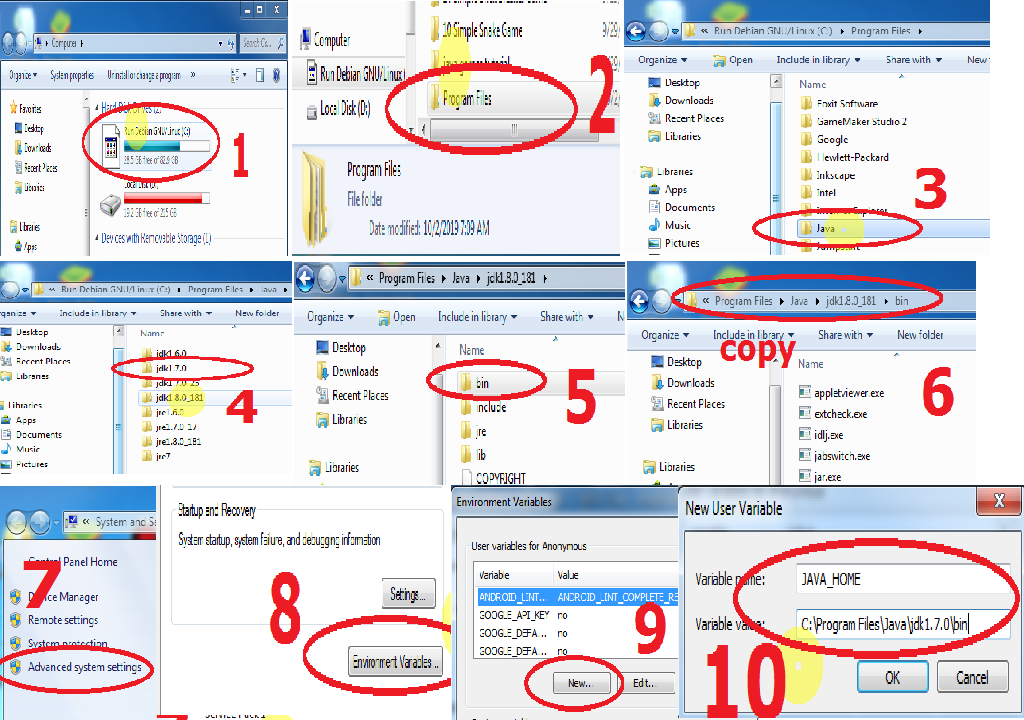
--Go to Java JDK installation directory in "C:\Program Files\Java\jdk1.7.0\bin" Copy this path
--Go to the environment path by Clicking: Window taskbar--->right click Computer--->Click Advance System setting ---> then go to Advanced tab Then select "Environment Variable" then create new Variable name and variable value by clicking the New radio button. Within the "Variable name" input these "JAVA_HOME" then in the "Variable value" point it to your C:\Program Files\Java\jdk1.7.0\bin 
that's it we are on a way of creating our first game and deploy it to a different platform.

After that we will also set-up Android SDK, to its path by extracting first it to the directory you want for example in "drive D:" or "drive C:"  once we did this, we can now copy the root folder of this SDK which is likely to this format "D:\Android SDK" copy it then add it also to the "Environment path" like what you did before in "Java JDK".


COMPLETE CODES

ANDROID MANIFEST XML CODE

<?xml version="1.0" encoding="utf-8"?>
<manifest xmlns:android="http://schemas.android.com/apk/res/android"
    package="com.aide.trainer.myapp"
    android:versionCode="1"
    android:versionName="1.0" >

    <uses-sdk 
        android:minSdkVersion="11" 
        android:targetSdkVersion="17" />

    <application
        android:icon="@drawable/ic_launcher"
        android:label="@string/app_name" >
        <activity
            android:label="My cool App"
            android:theme="@android:style/Theme.Holo"
            android:name=".MainActivity" >
            <intent-filter >
                <action android:name="android.intent.action.MAIN" />

                <category android:name="android.intent.category.LAUNCHER"/>
            </intent-filter>
        </activity>
    </application>

</manifest>

MAIN ACTIVITY CODE

package com.aide.trainer.myapp;

import android.app.*;
import android.os.*;

public class MainActivity extends Activity
{
    /** Called when the activity is first created. */
    @Override
    public void onCreate(Bundle savedInstanceState)
{
        super.onCreate(savedInstanceState);
        
        // Set main.xml as user interface layout
        setContentView(R.layout.main);
    }
}


MAIN XML CODE

<?xml version="1.0" encoding="utf-8"?>
<LinearLayout 
xmlns:android="http://schemas.android.com/apk/res/android"
    android:layout_width="fill_parent"
    android:layout_height="fill_parent"
    android:gravity="center"
    android:orientation="vertical" >

    <TextView
        android:layout_width="wrap_content"
        android:layout_height="wrap_content"
        android:text="Hello World" />

</LinearLayout>


Post a Comment

0 Comments